Using a Polarizing Filter at Sunset
posted by micki at 7/15/2006 09:09:00 AM
![]()
No digital photography here folks. Only film, all the time. No post processing. I shoot it, I have it developed, I scan the print, I post it. It is hoped that you would respect my ownership of the images posted, despite the ease with which you could copy them. If you would like a true photographic print of any of my images, please contact me at goodiesbaker@yahoo.com and I will be happy to provide you with one. Weapons of Choice: * Minolta 7000 * Minolta 9000 *Minolta Dynax 9 * Konica Minolta 70 *Minolta x-700 * Minolta AL-F Rangefinder *1958 Minolta Autocord *Holga *holgamod Holga *PIX Panorama Toy Camera *Polaroid One Step Close Up Lenses: Too many too list, just read the stats for each shot I post Scanner: Epson 4990 Perfection Photo Favorite Films: * Kodak Tri-X * Fuji Superia * Ilford HP5+ -- Goal: To make the best exposure possible, on film. A Theme a Day *Sunday – Take A Guess *Macro Mondays *A Glimpse of My Town Tuesdays *Wednesday's Colors *Thursday's Critter *Unique Film and/or Camera Fridays *Saturday – Anything goes


22 Comments:
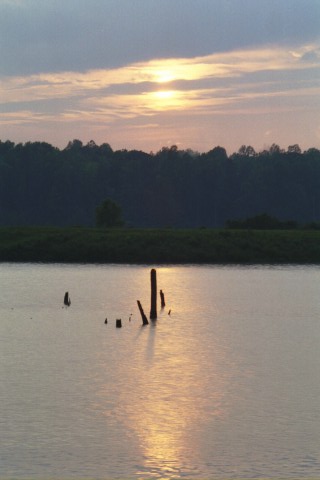
Today’s photos are an example of what a difference the polarizing filter made in the capture of this mediocre sunset at the park last month.
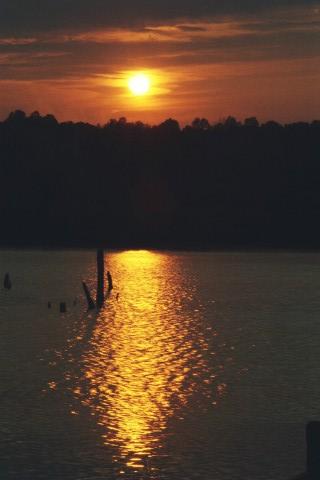
The rain had only ended a few short minutes prior to shooting these images. For the first image, I metered the sky with the sun out of the frame. For the second image, I attached a polarizing filter and cut exposure time by ½ stop. Such a big difference.
So, which photo shows what the real sunset looked like?? It was somewhere in between each of them, actually.
Sunset 1
Camera - Konica Minolta 70
Film - Kodak Max ISO 100
Shutter Speed - 0.5”
Aperture Setting - f-38 Aperture Mode
Lens - Sigma 70-300mm zoom lens @ 135mm
Scanning Method - York Photo Labs’ scan of my negative
Sunset 2
Camera - Konica Minolta 70
Film - Kodak Max ISO 100
Shutter Speed - 1/8 -.5EV
Aperture Setting - f-38 Aperture Mode
Lens - Sigma 70-300mm zoom lens @ 135mm
Scanning Method - York Photo Labs’ scan of my negative (My cheap scanner couldn’t do it again)
Things I’m Thankful to Cliff For…. Making sure we grew up with late summer night corn roasts.
a very different perception of a artist at the same point ;) all the photograph work ;)
have a nice w-e
How is the only woman I know who still shoots with fim and Sinem's favoutite blogger doing?
For me I prefer the bottom shot, very subtle and captures the whole sunset thing in my veiw. A very good shot. Not really feeling the top shot, just another pole in the river shot to me.
Suby
P.s
Hope you have an extra room in your place as Sinem swears when she next visits the US, you are one person she must visit :)
Micki. Great comparison photos. I must admit the second one with the rich colours is my favourite.
Very evocative pictures. But sunsets, I think, are rarely mediocre (when the sun is there to be seen); certainly this one isn't. Nicely seen.
Wow! Amazing difference indeed! I'm still on the hunt for a neutral density filter...they are hard to come by in 67MM for some reason. Great shots Micki!
I love using polarizing filters. They do make a huge difference. I also like metering in different areas for the best exposures.
I like the more dramatic one with the polarizer.
The first shot offers most to me. The polarized and stopped image is the result we have come to expect but I suspect the other is closer to what was really there to the eye. Photographically, as you say, somewhere between the two is where you’d like to be.
It's pretty cool to see the difference that the polarizer made on the sunset. It's not a warm polarizer, is it?
Thank you for showing this. Mind you, a polarizing filter costs $60 in my village, so I am glad to see the difference is so striking. I find both pictures beautiful.
Beautiful sunset I like the second one...stunning!!
Interesting experiment you did there. Actually besides the colour, i like the first picture better as it shows some details in the woods. i might want to try fixing a PL and increase exposure time by about 1 to 1½ stop (depending on orientation) so as to retain as much detail as possible in both the highlight and shadow areas.
WOW.
Now I want a filter!
Actually, since I have photoshop to do what this filter does (although Im sure it wont come out as good) for now there's not much of a need, although it would be nice to have one, they're very expensive.Maybe in a year or two :D
Thanks for posting this I was really snooping around for a good example of what a difference it makes.
GREAT GREAT SHOT!!!
The second one is a just stunning, great colors!
Mickiiii, morning, you know what me going to ask...
Where is your post for today? :)
No excuses about being 7 hours behind the UK allowed LOL.
Suby
P.s
Yes I am a hard task master, you love me for it :)
Well thought out and educational post Micki. It's a good reminder for me to go buy some more filters. Maybe even an Orange one!?
Thanks as always for your considerate comments. You have inspired myself and others.
wow..really beautiful...amazing colors and refecltion:-))
The polarized version has richer colors and therefore has more appeal, however the first one is striking in its own way. I like both of them. Also, when you are looking directly into the sun, the polarizer works more as a neutral density filter allowing for longer exposures while saturating the colors a bit. For maximum polarization, shoot perpendicular to the direction of the light.
I definitely prefer the rich saturation of the second image, but I'm craving a bit more of the dynamic range found in the first image - probably much like what this scene appeared like to the naked eye. What a light show it must have been!
Great post, check here everything about polarizing filters http://polarizingfilter.blogspot.com/
good
Not to burst any bubbles, but the only differences between those two photos are exposure (bottom picture darker) and time of day (bottom picture more red). Polarizers generally don't do anything into and away from the sun as the light isn't polarized to begin with.
And I assume you meant f/3.8 not f/38. Your EV was closer to 7 in that case.
If you want to use a filter on a sunset, try a graduated ND filter.
Post a Comment
<< Home